
Estimated reading time: 8 minutes, 9 seconds

This situation caught me off guard. I was presented with a thermocouple from an AO Smith, sealed combustion chamber water heater. The symptoms included that the water heater would go off for no reason.
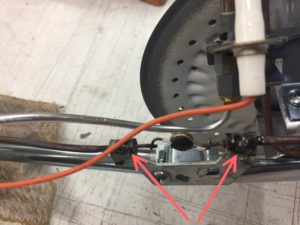
Eventually, he couldn’t even get the pilot lit. With careful inspection, you could see it had a little button in line. I had never seen one before, but this is what I learned.
What is a thermocouple for anyway?
Thermocouples are used in gas appliances that use a standing pilot. That means that there is a small gas flame on all the time. Without the Thermocouple doing its thing, the pilot won’t stay lit.
Other included safety devices
Flame sensors work similarly, and basically ensure that there is a flame before the gas is allowed through the main gas valve to be turned into flame for heat. If it wasn’t for a functional thermocouple, the gas valve would just allow the gas to flow into your home without being burned. This is when explosions happen, and entire buildings get blown to smithereens.
How thermocouples work
A thermocouple is an impressive little safety device that senses the heat made by a flame. Through a system of having dissimilar metals joined, thermocouples generate a millivolt charge of around 12 – just enough to tell the gas valve that the pilot light is on. I think that the coolest part is that there are no moving parts.
OOPS!Many appliances don’t have thermocouples, like gas stoves and barbecues. Because of that, they need to be watched closely and are very dangerous, especially around children and especially in windy conditions.
The thermocouple is always high on the list of possible problems in gas appliances troubleshooting. Unless you are handy and understand how to test them and or change them out, I would recommend calling a professional. The problem with this one, in particular, was that it was intermittently shutting off the pilot.
The tipping point
It wasn’t until that fateful morning when my friend’s wife couldn’t take a hot shower that hubby had to spring into action and fix it. He called on a Sunday to help make it better and being the go-to guy that I am, I accepted the challenge. It took lots of research to discover what the aforementioned button was. It had a 190 stamped on it, and this is what we finally discovered.
The typical thermocouple costs about $7.00 The fancier one is $35.00. The little button is called a Thermal Cut-Off, or TCO. Unfortunately, there is no place open on a Sunday that carries the fancier one. This reminds me of a “suspenders and belt fix” only it is a “suspenders and two belts”… a bit of overkill in my opinion. The burner assembly that includes the thermocouple is around $80
This is what A.O. Smith has to say about their fancy Thermocouple device.

COMBUSTION CHAMBER TEMPERATURE SENSOR
The C3 Technology water heaters will come equipped with a thermal cutoff (TCO) device that is
integral to the thermocouple. Temperature cutoff points range from 160°C to 200°C depending on
the model. The TCO is an automatic reset thermal switch. When activated it will open the
thermocouple circuit and shut off the main and pilot burner gas flow. The pilot would have to be relit
after the TCO has had sufficient time to cool down (the sensor is below 120 degrees F).
The TCO performs two primary functions:
• In the event of flammable vapor ignition inside the combustion chamber, it senses the
the corresponding increase in temperature and shuts off gas flow to the main and pilot burners.
• If excessive temperatures inside the combustion chamber indicate poor combustion due to
a clogged LDO screen or inadequate air for combustion, the TCO will shut off gas flow to
the main and pilot burners.
Ultimately I discovered ours had a broken weld at one side of the button that was most likely due to a manufacturing defect. I saw lots of complaints about this little button, but no good solutions or explanation of what they were on the internet. There just wasn’t any good advice about where to find them, or if they were essential.
How I fixed my problem
I replaced it with a readily available “universal type” from the hardware store. It worked just fine. There is a flimsy black plastic screen that I washed out.
On Monday, I went to the wholesale house and sure enough, I found them for $35.00 but they were out.
I just had to fix another one where the only thing I could buy was a new burner assembly! $110 This one also had a broken weld at one end too. I am going to get a few of these little gems and keep them handy for the next big water heater problem.
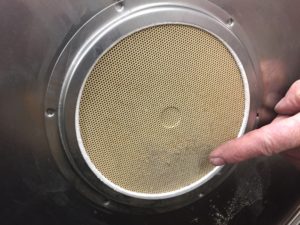
The mysterious LDO & Flame arrestor
Turns out there is an LDO means Lint, Dust & Oil Screen is a silly little plastic thing that you can easily take out and wash. Then there is the Flame arrestor (it is a hidden screen thing that is hard to get at). It is a 1/2″ thick sturdy ceramic air filter of sorts with thousands of very tiny holes that commonly get clogged.
NEW SOLUTION INFORMATION 2-2017
AO smith redesigned the water heater so I guess we were heard loud and clear. The temp out button still exists but it is easily accessible now and has a secret manual reset.
I was asked by a reader Joe Low, to participate in a solution for his 11-year-old water heater that would temp out upon taking a shower. Once cooled off he would have to relight the pilot. I was going to get him a new burner assembly (Which he has already replaced once) when I spoke with Lonny, the Manager of my Ferguson store. He assured me that I was making a mistake, “Temp out is a sign of a problem!” it made sense to me, so we elected to just replace the water heater for safety’s sake.
Ultimately, I used the removed water heater as a test subject. Upon disassembling it in the name of science, I found this clogged flame arrestor (Image above) and some signs of excess heat in the burner box. (His utility room housed a furnace too but it was spotless.) You will need a mirror to see the flame arrestor screen from below.
Temping out?
If your water heater is temping out, clean out this well-hidden part. You can get to it from the bottom with a vacuum, (you’ll need to adapt something to suck from the top side of the air intake base) or even better, use compressed air with a long flexible, or bent extension. you can also get to it from the top. It lives just under the burner assembly (You will need to remove the burner assembly to get access). I suggest that you clean it from both directions as it is partially obstructed by metal from above. When I hit this flame arrestor with compressed air the dust flew!
Naturally, there is no mention of this flame arrestor in the owner manuals. I say this sarcastically because it would be helpful if it was published for general consumption or advanced diagnostics.
Other things to check
The other thing that could be suffocating the flame is the lack of combustion air.
- Is your house too well sealed?
- Is your utility room too well sealed?
This can be easily checked with a piece of toilet tissue. (I will add a video soon)
We found one home where the air filter cover door was missing, so when the furnace kicked on, it was sucking the combustion gasses right out of the water heater top into the furnace intake (That is deadly) Always look for signs of the rollout on top of the gas water heater, and have a working CO monitor in the home.
The quick fix from readers:
This has been my most popular blog post of all time, the common theme of the comments is appreciated. The best solution I have discovered by accident is just to re-solder the button back on. I am not sure how long it will last, but I would cautiously recommend this fix to anyone. Whatever you do, remember messing with gas has risks, do not bypass safety features.
This house exploded in New Jersey as a result of a gas problem.
Mine just failed
I just had mine fail. I found it simple to remove the three parts.
- Gas line
- Thermocouple
- Pilot gas line
Then I used my soldering iron to remove the button and then filed off the back to see the button. Then I soldered the two brass parts. the straight one to the edge and the curved one to the center of the button. This was harder than it looked because all the parts are small. All better now.
Bonus Round Questions?
- Who has a war story to tell about these things?
- Who has some additional helpful information they would like to share?
Your comments are welcome. To ask questions or get more information about remodeling, click here to email me directly, or call 208-947-7261
If you or someone you know is considering remodeling or just wants to speak to a trustworthy remodeling contractor please contact me, you’ll be glad you did.

Good article Joe. When you say that you “replaced it with a readily available standard one that is readily available temporarily,” are you saying that you used a “universael thermocouple,” or AO Smith thermocouple with the TCO? I have the same problem, and not sure I’m willing to wait to get the A.O. Smith unit. Thanks.
I did replace it with a universal thermocouple and removed the grill/ vent thingie. The vent screen gets clogged and then the flame gets starved for air and “Rolls Out” that is why the they put a button inline to prevent the flame from leaving its containment area. Although it is not what AO smith wants you to do, it works. I also updated the BLOG post to make it more clear. Thanks
Thanks Joe, I had a similar situation of replacing a TCO with a universal and it works. This is about only place I can find that says you can do that.
Anthony, I am sure there are thousands of folks that could use this advice, however very few are daring enough to fix their own equipment. Normally a plumber would just come out and replace the whole thing. An unethical one would solder the TCO and have a rotating one on the truck. A licensed plumber should never do this for their clients. Too much liability. We understand how things work and in our own homes are willing to accept that tiny risk. The down side as I mentioned in the article is potentially HUGE. To that end be safe and I will continue to try to get the word out to the industry to use better solder!
Great Write-Up!
I am having the same issue with my Hot Water heater. Your post helped me understand what that resistor thing was. I am deliberating just soldering the thermal cutoff where it broke, in stead of replacing the entire thermocouple with a generical one (with no TCO). Thoughts?
Glad you found it helpful, There is a core to the thermocouple and it is a sensitive device. In other words it reads millivolts. There is no way to solder a broken one back together. Measure the length and go get a cheap replacement at a hardware store. Be sure to remove the screen or you could have “Roll out” issues that I suppose could start a fire or starve your pilot light of air.
Thanks for the quick reply. My H2O heater has a grommet that encloses the pilot line and thermocouple line. I would have to cut that grommet to install the new universal thermocouple. It would be great if someone sold the entire burner assembly, which I think they do. I just have no idea where to buy it. See page 20 of link below.
https://docs.google.com/viewer?a=v&q=cache:-gWUFTVGzjwJ:www.hotwater.com/resources/literature/service-handbooks/residential-gas-and-electric-service-handbook-(tc049r2)/+Thermocouple+Thermal+cutoff+hotwater.com&hl=en&gl=us&pid=bl&srcid=ADGEESiIBmn9X6oe4PiEvQJ47mAUSBHJVVQo8HLosh3OGFMYub2cXGa0qOkmxW0gSIka-5ILauDbGodSagn5rVTtvS_wiVkfSypgxqM67r4Guts_6ho645b28UsI2elljpL644CgujU3&sig=AHIEtbS9_OTOycRTs-9tmPJ_GSXTjpheVw
This is actually a better link than the giant one I sent in my last post.
http://www.hotwater.com/lit/training/320991-000.pdf
The grommet is part of the explosion proof system and the sealed combustion chamber. Personally I would go for it and get the darn thing out then replace the thermocouple and use silicone to patch it up. Is your water heater in a place that is likely to come in contact with combustible fumes? I would hate to have anything bad happen. Lord knows you will be voiding the warranty. Thanks for the short link that is the best set of instructions and photos I have seen yet. Let me know what you end up doing.
I have previously replaced my thermocouple (TCO included) with a generic one obtained from the hardware store due to pilot light not staying lit. I did not attempt to remove the inlet air screen/filter thingie. How do you remove this inlet air screen/filter? I wasn’t aware that there could be a flame roll-out problem – nor do I understand why that would happen with inadequte inlet air. (My water heater is a Reliance brand with a similar “sealed” combustion chamber).
the problem could be related to not enough air getting to your water heater. On the link I sent, they cover the routine maintenance and troubleshooting very well. In my case the darn wire was broken at the TCO in your case it might be related to air starvation of your furnace. Roll out occurs when there is air hunger. The TCO button is a safety cutoff to prevent roll out. Make sure you are solving the right problem. My hunch is that the air filtration screen is clogged which could easily be the root of the problem. Your screen looks more substantial than the one on the water heater I was working with.
Note: the inlet air thingie I’m referring to is the internal, round “flame arrestor” (per A.O. Smith documentation), not the rectangular external plastic grill at the front, bottom.
The button piece that I have an image of it the roll out flame arresting device. when it fails the thermocouple will not allow the pilot part to work that is why I replaced it with a standard one. It is a sealed combustion chamber but to have a flame it needs air so it is coming from somewhere, What I usually find is a screen perhaps at the top or bottom on your device but it is there otherwise it would not work. here is a link I found. check out pages 16-25 http://www.reliancewaterheaters.com/lit/spec/2006ServiceHandbook.pdf This is the best information I have found on your situation. Good luck. Let me know how it goes.
Thanks for the link. Clearly A. O. Smith and Reliance are the same company because their documentation is identical.
My water heater has been working fine since I replaced the thermocouple (with a TCO) with a new one (without a TCO).
My external (LDO) air inlet screen never seems to get really dirty. My understanding is that the internal ceramic flame arrestor (that has tiny perforations for air inlet to the combustion chamber) may get clogged with dust and not allow adequate air fow. I ,of course, had cleaned the perforations the best I could with a brush and vacuum cleaner, top and bottom (just before I decided I needed to replace the thermocouple because the pilot still went out).
I initially thought you had removed the internal flame arrestor (that has the perforations), but obviously you were talking about the external air inlet (LDO) screen.
My question for you now is, what exactly happens when the flame “rolls out” due to lack of air? I haven’t heard of this situation before. (I thought the TCO was only needed to stop gas flow if something like gasoline fumes ignited in the chamber.) Thanks again.
After looking more carefully at the Reliance handbook, it states that one of the functions of the TCO is to shut off the gas if inadequate air supply is available for complete combustion, resulting in an increased temperature in the chamber. However, I still don’t understand why incomplete combustion INCREASES temperature.
Roll-out is just like it sounds the flame comes rolling out into an area that it doesn’t belong triggering the TCO button to operate and stop gas from going through the gas valve. I think you need to see it to understand. The flame roll-out comes from a starved burner area. The build up of gas lingers until it gets enough air and then it ignites rolling out of the confined area where the flame belongs during normal operation. You can imagine how dangerous this situation could be and why the safety TCO button was invented.
Just a final follow-up. I examined the removed thermocouple line with the TCO “button”. The solder joint of the outlet wire at the TCO was broken, but probably intermittently allowing connnection.
I have since replaced my temporary thermocouple (without a TCO) with a new (original parts) pilot assembly with the TCO ($92+ total). So far, so good.
The new requirement of the internal flame arrestor (to handle gasoline vapor ignition) was a poor design change due to its tendency to clog-up and block inlet air.
The LDO air inlet screen is the first line of defense to prevent clogging of the flame arrestor. If you have removed it, and relaced the thermocouple with a TCO with one without a TCO, you may be asking for trouble.
uhmmmm, for years I / my business serviced both electric and gas hotwater heaters. I retired some 15 years ago – closed my business…. and just now ran into the “extra safety” temperature control button in my AO Smith Conservationist — approaching 10 years old (ironically, my first one sprung a leak around the drain weld– took back to my wholesale supplier literally the week BEFORE the TEN YEAR warranty expired!). Now this “replacement” Conservationist is nearing 10 years WITHOUT a single problem till this week — pilot out twice, tho the 2nd time feared that perhaps the whole house fan was on prior to utility room door being closed… resulting “blowing the pilot out”…. BUT decided to just replace the thermocouple (since I still have items left from my business)… First time I’d pulled a sealed unit apart with the extra thermo safety button! Sooooo, needless to say, decided to do a little research BEFORE just putting in a universal unit. While I fully understand the engineering behind the design, AND that the legal world we live in today DRIVES companies to CYA! I also realized there have been literally millions of water heaters working very well WITHOUT all the extra devices for generations! AND, that said, IF I were still in business, realize I would most likely tell “most” customers that “my hands are tied” due to government regulations and legal issues; AND I HAVE TO keep/restore their heater to its original design with ALL the safety devices in place. BUT all that said, I like many here no doubt, and understanding design theory & function, have little problem “converting” my personal water heater to a “universal design”… without all the bells and whistles! — a design that is both functional AND safe when common sense safety measures are employed in the home / business!
Thank you Bruce, I agree with you completely and appreciate your endorsement of the situation based on your expertise. Thanks for reading and responding to my blog, I believe you and I just helped a whole heap of folks save a bunch of heart ache, misery and money.
Its a safety device device that keeps your ass from blowing up, and you can’t find it anywhere so homeowners don’t attempt to be plumbers and blow themselves up.
I agree with your comment Robert, however there are those of us that fix stuff and like to understand how things work. I believe we deserve a little credit and answers to things that don’t make sense, especially when the part is defective not the water heater. If in fact the button was working and preventing roll out like it is supposed to, I agree, messing with it is foolish and cleaning the air filter would fix everything, however my experience is that the primary issue is a manufacturing flaw that causes the failure. I think it is interesting how these buttons got added to thermocouples and why they fail so often. If the welds on the buttons were done correctly, I would have ever written about them. On the off chance that I didn’t make myself clear to my readers, I will repeat myself. It is the correct thing to replace a “thermocouples with a button” with the exact same part. Thanks for adding to the discussion.
I wish I had found this discussion last week when our built in 2004 and out of warranty State “Select” 38 gallon natural gas-fired water heater quit working. I found it very hard to keep the pilot lit, and would have to hold the gas control knob down for several minutes to ger the pilot to stay lit. As often as not, it would keep not keep burning long, or would go out when the burner started.
Reading-up on the problem, I decided to see if it was the flame arrestor that was the root cause of the problem, and tried loosening the nuts that hold the gas inlet and pilot assembly and observation window against the heater to let extra air in for combustion. That seemed to do the trick, at least for a day.
Then, I telephoned State, and following their advice, I got one of those flat, looped toilet bowl brushes and used it to give the bottom of the Corderite ceramic disk a good dry brushing and vacuumed the space under the disk. That didn’t seem to make much difference.
Finally, yesterday I undid the two nuts completely and disconnected the ignitor switch, thermocouple, pilot and burner gas supply connections at the gas valve and pulled the whole business out.
The top of the burner was heaped with rusted fragments from the flue, and there was more inside on top of the radiation shield, and on top of the cutout in the middle of the shield where I could see the top of the Corderite disk. The “ceiling” of the combustion chamber was coated with a white powder which I dusted-off with the toilet bowl brush.
i even reached up into the flue and gave that spiral inside it a number of twists and turns to break loose any rust flakes. Then I vacuumed the whole mess out until the chamber was clean as new.
I wonder if the white powder is from the combustion process or if it is from decomposition of the Corderite (I thought Corderite was just the name of the company that makes the disk, but it is also the name of a mineral. Who knew? Not me!)
Meanwhile, I had ordered the whole “Pilot Assembly” from Amazon.com (about $40 with shipping) and with the pilot assembly out, I sanded the thermocouple bulb bright and put the heater back together and tried repeatedly to start the pilot flame, but it just wouldn’t keep burning.
I pulled the whole burner and pilot assembly out again and somehow must have bumped the little fat-coin-battery thermal cutoff, because one of the leads came away from the cutoff body. Maybe throughout all this struggle the lead had been making and breaking contact. Anyway, I got a needle-nose pliers and twisted the loose lead so that it was sprung securely against the metal body of the cutoff and that made a good contact with the inside wire of the thermocouple. I reassembled things, and now have a pilot flame and am making hot water. As soon as the Amazon order arrives, I’ll replace the pilot assembly.
Before finding the loose contact, I checked the thermocouple with a millivolt meter and a torch, and it works OK. In doing this, I saw the wire inside the thermocouple tubing is pretty fat, and seemed to have a brown coating on it where the wire emerges from the tubing to connect to the cutoff. That coating must be the electrical insulation for the wire I’ve been reading about in the past few days. It is so thin that it could be paint for all I knew. I also haveto admit that until this wholeepisode, I thought these thermocouple devices worked by thermal expansion of a fluid inside the tubing instead of being electrical. Another light cast into my vast long-standing areas of ignorance (I am age 72).
The darn button thingie is a problem looking for a place to happen. The manufacturers need to figure out a better way to connect it inline with the thermocouple. This problem keeps rearing it’s ugly head and should be looked into by some consumer protection agency.
Thanks for the info . It is very helpful . I just solder it back the button to the wire . Soldering material is melting on 240 C . The safety range on the button /sensor is from 160 C to 190 C. Works good now . Thanks !
That is awesome, I’m glad you were able to fix it. Did you use some special solder, funny soldering it did not cross my mind but that is usually where the failure occurs.
Thanks ISN ! Great fix, soldered that little booger back on and it worked perfectly.
Fantastic, I’m glad you were able to fix it rather than replace it! Thanks for letting my readers know too.
I noticed that the flame is mostly orange. Shouldn’t it be mostly blue. Could the intake be clogged. I opened the inner access panel and it doesn’t seem to make a difference.
I think I jumped the gun. Flame is now blue. Maybe condensation caused the flame to be orange because the tank was cold. Seems ok now. Soldering the button worked so far. I used regular solder.
Awesome, I’m glad you decided to fix the unit rather than replace it. Regular solder should work. Let me know. Like you experienced, the flame color should work itself out. clean the air filtering screen to ensure the gas is getting enough air to make a nice blue flame. Yellow indicates that it is burning up some lint or debris and should be short lived.
I can’t believe this blog goes back to 2011 but I have the same problems with an AO Smith gas water heater that just now started. The heater was installed (in the attic) in 2005. A new twist …….I read about “ambient room temperature” vs. water heater problems. I went in the attic to check why no hot water and found pilot/burner going out or not staying as others have described. The attic temperature was 125 degrees. I fiddled with it for a short time and came down to seek help on line. Too darn hot to do much with it now. What do you think, Joe?
Ron, I do not believe that the thermocouple or the water heater cares what temperature the room is, I can imagine the water getting super heated in an attic to the point it could pop off due to expansion and pressure build up (the T & P) valve opening to prevent a disaster. I could also imagine that scalding water could be created. Gas water heaters are pretty simple animals. Components include: 1 a thermostat that senses the heater temperature (so if it cools to below the set temperature it tells the gas valve to turn on, 2 a gas valve that lets the gas out to the burner. 3 the pilot itself, and 4 the thermocouple which insures that the pilot is lit. (The pilot and the thermocouple and the water temperature sensor all tie into the gas valve. If you have to keep relighting the pilot I would replace the thermocouple first. If you get stuck consult a professional. Best of luck! what part of the country are you in?
Good morning, I have changed thremocouples before and think you are correct and will get it apart. I’m in the Baton rouge area and will work on it before the attic heats up. Thanks
Great let me know how it goes
Follow-up for attic installations. I just received my thermocouple set from Amazon (highly recommended) and with the instruction book is a Technical Bulletin #186211-000. I’ll quote from #2 (when) “Temperature conditions exceed the TCO switch cut-off limit…………..if your water heater is in an area where the ambient temperature exceeds 115 degrees (attic, garage etc.) to contact Residential Technical Assistance”. There is more info in the paragraph stating that operating conditions can be adversely affected by high ambient temperatures.
I thought I would pass this along because the thermocouples may, in fact, not have failed. I have 2 identical AO Smith water heaters and the second heater shut down yesterday. How odd is that! Attic temperature…..125 degrees!! When the attic cooled to 78 degrees (yep, 3am) I successfully re-lit it. I would recommend cleaning the flame arrester and cleaning the filters at the base of the heater first and see if it will fire up. I will be cleaning mine in the morning.
Thanks, Joe
That makes sense! If the temperature is too high in the attic, it could trick the TCO button into thinking that there is a flame “roll out” In this case I think you would be better off with the old style thermocouple which only cares that a flame is burning on it.
i recently replaced the burner assembly on my h20 heater, it had one of those button things on it. once it was replaced the same thing (the button ) had broke again. should i not put a universal thermocouple on it? could there be another problem i am not aware of, im not really in the mood to blow my house up, but i would like a hot shower
If the button is just separating at a soldered joint then I would re-solder it with a higher melting point solder. This has been the answer for many of my readers. The button gizmo is designed to be a circuit breaker that opens the thermocouple circuit if “Roll Out” (of flame) occurs. This situation is generally caused by poor ability for the flame to get the air it needs. Be sure to clean the screens that allow air into the unit. My suspicion is that it is warm where the water heater lives and whoever made the component used an inferior wimpy solder. My advice is to take a cover off and actually watch what happens when the water heater calls for hot water. (turn on a hot faucet somewhere and watch) Does the flame come rolling out to you? does it look normal? Blowing up is less of a concern with this situation. with flame roll out, catching something on fire is the big worry.
If everything looks normal and you don’t want to deal with the button anymore or solder it back together like I suggest then a universal thermocouple will work. There is a bit of a risk whenever you bypass a built in safety feature. Best of luck.
Our A.O.Smith Promax Plus GVR 50 100 had recently the same problem of burner and pilot flames shutting off every few minutes. Took the burner assembly out and saw the thermocouple, button, flame proble and other parts darkened and rusted out. I ordered the whole new burner assembly from supplyhouse.com at $79.95. Noticed that the L shaped gas tube was shorter and the other thinner tubes much longer than the original ones. Everything was exactly the same. After cleaning the filter and vacuuming the bottom, I installed the new burner assembly last week. Worked for 3 days but started shutting off again; each time turning back on, it shuts off again after few hours. Also noticed slight yellow flame along with blue. What could possibly be the problem even after cleaning, vacuuming and installing brand new burner assembly? Professional support will be much appreciated. Thanks.
Look closely at the the air being supplied to the unit. is it starving for makeup air. This could be from being in an airtight room or a clogged vent system at the base of the unit. there is often a screen system that allows air (or not) that is full of lint or what have you. wash the screens out and reset them. Yellow means it is starving for air and is not burning efficiently, it should be blue with a dab of yellow. Yellow when you tap the burner is just burning microscopic debris not to worry. Let the flame settle down and evaluate at that point. Let me know if this helps.
Thanks Joe for you reply. Before installing the new burner assembly, I brushed and vacuumed off the circled vent which is located right at the center base where the burner sits. Managed to clean and vacuum the very bottom vent as well, though both with difficulty. Could it be some other problem such as the thermostat itself or the gas valve or perhaps the exhaust leading to the roof which may be clogged?
At this point I feel that you need to have the unit evaluated by a pro. I am sure you have them in your area and that they would be able to diagnose your situation. It sounds like the primary issue is a starving burner and it is worth understanding what is going on because starving burners are not efficient and can cause roll out. Let me know how it goes. Odds are that the gas valve is not the issue, they either work or they don’t and the thermostat is the same way. I looked back at your original post and you may be experiencing roll out which is what the button is supposed to protect you from in the first place. The different lengths are likely related to the replacement burner is designed to work on several different styles of water heaters and should not pose a problem. Best of luck.
So I too just had the experience described in the above thread. I removed old thermocouple and replaced it with an universal one from the guys with orange aprons. I had to remove half of the orange grommet to slide the universal through te panel. Connected everything and all works fine. Question is, do I really need to replace the entire component or am I ok with using the universal? Water heater is from 2003 so no warranty is a concern.
Craig, I believe that you are fine, see if you can solder the old one back together before you throw it away. Be sure that the water heater is breathing by watching the burner come on. The fear is that there will be “Roll out” which means that flame rolls out at you from the burner. (A very dangerous situation) if not you should be golden. Always keep combustibles away from the gas water heater.
Thanks for writing this blog. I was dumbfounded when I saw this thing. I’m glad your post was here to confirm what I was thinking, which was that A O Smith had too much time on their hands and tried to get cute with this redundancy. The price has gone way up at least in my area for this item to over $64.
You are welcome, I think it is so funny that such a simple thing can stump us. Thank goodness for the internet!
Just soldered the button back on for my A.O. Smith 100, got a quote from a guy who could have this obscure part to me “possibly tomorrow night” for $88.00, was pretty disheartened. I love the internet so much sometimes. Had a lukewarm shower this morning and a hot one tonight, thanks for the solid info and FREE fix! I wonder what makes them break so easily?
I considered contacting the company to discuss the weak connection, it could be that they are using a solder with too low of a melting point and the repeated exposure to heating and cooling is the culprit. That is my optimistic belief. The reality is that it is not in their best interest to fix it or the plumbers or anyone else except us. Good for you for using your resources and figuring it out.
What is the part number of that TCO? Where can I buy it?
If you have tried to repair yours (by soldering it) and have made sure that there is no serious roll out problem, then you could go with a simple thermocouple without a button for a quick fix that you can get at most hardware stores. If you have decided to go back with original parts, then you will have to buy at a local plumbing supply house, like Ferguson. Check with a plumber they will have access to purchase what you need from a wholesale house. I’m not sure where you are in the world otherwise I may be able to help more. By describing what you have (Make and Model) any supply house can assist you. Last but not least you can always contact your water heater manufacturer. Good Luck Let me know how it goes.
Thanks Joe,
Just replaced my thermocouple-with-diode with standard, and it ‘s working fine so far.
So helpful!
Good deal glad you found this information helpful.
Let me add my thanks for this great thread Joe! Yup, I went from complete ignorance of this system this morning with cold water to shave with to taking your “4 credit course” and soldering the thermal button back inline. I’m really not sure if I broke the solder joint pulling the burner out and playing with it and a gunked up thermocouple was really the problem but anyway I’m back in business and gonna take a nice hot shower now…! 11 years old heater. Wondering if I should lay in a spare thermocouple assembly or figure a new tank will be needed next. Decisions, decisions… Thanks again!
Awesome Jim, glad you are back in business. I was just preparing a post on how long things should last and the consensus is that water heaters if properly maintained (flushed out annually) should last for about 16 years. I have not heard of a button failing again if soldered back properly. My hunch is that the solder from the factory was not done correctly by some nameless automated soldering robot. It is hard to describe how great a hot shower feels after conquering a water heater problem yourself.
Thanks, I was in the process of waiting for my soldering iron to warm up when I came across this article. It’s all back together now and fingers are crossed that my soldering holds up to the test of time. I was going to just put a standard thermocouple in my AO Smith water heater when the hardware store guy told me it wouldn’t work, but might get me by for 3-4 days until I could get one from a plumber. Article was helpful and informative.
You are on the right track, your fix should work forever. If you do go with the standard thermocouple (which would work for a very long time) without a button the only difference is that it would not have the added protection of the button if “flame roll-out” occurs. Thanks for the kudos.
I’m on my second repair of an AO smith water heater with the TCO issue. The first one, a few years back, I bypassed by sniping out the button and soldering in a piece of solid copper wire until a local plumber supply sold me the whole burner assembly. That sale took some arm twisting, with me leveraging my employers name which does plenty of business there.
This second one (had to happen when I’m under the weather and starting my holiday break) was a broken connection of a working TCO on the cold end of the T/C leads. A dab of solder on the outer rim of the TCO and it put her back to work. At well over 12 years, I was ready to invest $500+ in a new heater, but not when the fix was that easy. Wish I had found this site my first go-around. I might have dug harder on the connection issue.
Thank you for finding my post and responding to it. This has been one of the most popular posts on my site. I am glad it validated what you already figured out but that makes what I discovered even more valuable to folks. Happy holidays.
I want to thank you again. the universal is working so well. So many other places want to put fear in our hearts for not using OEM.
I wasted so much time considering a universal before I read this blog. Thanks again.
Honestly it is the next best thing to OEM, I am sure that there are regulations we are bypassing and you are skipping a safety feature. You do this at your own risk. The connections to the little button need to be made stronger and until that is done, it makes no sense replacing the entire system because of it. It was a pleasure providing the background for you to make up your mind which way to go.
Great Post. My heater is about 13 years old and I had a problem with my pilot not staying lit. I just replaced with the universal thermocouple without the TCO button. I guess I need to determine if I should leave it this way until I replace the heater, or spend the $75-$100 for the new assembly with the button.
My sense is to leave it alone, it is working and for whatever reason the CO is not. Look at the flame carefully during a cycle of turning on, running and turning off and see if there is any roll-out. If there is you need to address that problem for safety reasons. If not then we have seen TCO with low tolerance for heat that goes off with normal flame and we have seen poor solder joints that result in intermittent failure of the thermocouple circuit. Ultimately you are taking on some additional risk by leaving it but it is a calculated risk.
Great posts here: I’ve recently been dealing with the same issue on a 13 year old heater. Didn’t know what the button (TCO) was at the time and couldn’t find out on the internet until I discovered this site. I bench tested my TC and it seemed to work normal, easily going up to 25mv and it was consistent so I cleaned everything up including the ceramic filter thinking that dust accumulation was the problem, but after relighting, it shut down after about 15 min of operation. My heater is in a mechanical room that is well vented and my burner flame and pilot flame were perfectly blue even before my intervention so I was a little stumped. Checked out flu draft and all was good there. I might add that this all happened over the Fourth of July weekend so finding parts in my rural area was a no go. I found a way to MacGyver things to at least have semi hot water. I set the thermostat to A instead B and then restarted the burner repeatedly until thermostat setting was satisfied and instructed the family to use hot water conservatively until a new pilot assem arrived and this worked fine. In my case extended burns were creating enough heat to reach the TCO threshold, but I still didn’t know if the TCO went out of calibration or the sealed combustion fire box was actually getting too hot. Here’s what I did: I received the new pilot assem and installed it and noted that the TCO was marked 190’C whereas the failing part was only rated 160’C. I’ve also ordered a new heater as at 13 years, I figure mine is on borrowed time anyway. I personally do not believe in altering the way a system is engineered to work i.e. The reason for the TCO is because we now are using sealed combustion which is very prone to restriction and thus flame rollout, which necessitates the need for this added protection device. You sort of need to work with the system you have as right or wrong, it was designed to work in consent with all the parts it started with. What I will do next: Because I want to know for sure why my TCO seemingly failed, I will bench test it and see at what temp it opens an I will repost the results and not be so long winded.
What I suspect: I think excessive sedimate in the bottom of my tank may well have been the root cause and not flame rollout. My theory is deep sediment at the bottom of my tank was impeding the transfer of heat from burner to tank water causing excessively long burn cycles and thus exceeding the normal albeit low set point of my original TCO. I will definitely repost when I finish the forensic work on the old heater when I take it out of service. Sorry for the length of my post.
I thought I had responded but just in case, do not confuse the flame being on a long time and roll out. If the flame is getting on the TCO that is not good. The specific problem I was dealing with is the poor welding / soldering of the TCO to the leads that are attached that fail because of poor soldering. If there is adequate air flow the flame should be able to be on all day without affecting the temperature of a TCO that is working properly. I agree that a full water heater is a inefficient device. I say water heaters are designed to be used for 12 years beyond that you are on borrowed time. Regular maintenance calls for flushing annually to get that crap out but it wont always come out. I look forward to your diagnostics. Not surprised they upped the temp of the TCO. They obviously have a learning curve.
Regarding your article https://levcocare.com/2011/12/02/thermocouple-with-a-button-wk-48-2011/ EXCELLENT INFO, but discovered it years too late. My 12 year old AO SMITH water heater is acting up yet again – most likely due to this thermocouple. THe termocouples only seem to last about 3 years in my heater. One plumber, without visiting but based on size of my heater laundry-furnace-dryer utility room with open door is not getting enough air so I have to put an open six inch wide pipe too THE ATTIC ! Imagine the cold winter air and summer hot air coming in, not to mention potential bugs, dust etc: You can not put on a filter. In fact, code in some cities now require such a pipe !. Otherwise he feels any gas furnace model will be starved for enough air leading to all sorts of problems including these thermocouple failures. This troubles me greatly. You mentioned there is a tissue test – can you explain or give link to video. Best Wishs and Thank You
A gas furnace that is starved for air will cause “roll out” or “backdraft” a condition where the flame comes back out of the burn area and that is why they put the thermocouple button there in the first place. once adequate air is present then either eliminate the thermocouple with a button and put on one without that will stop the problem you are having every 3 years they cost under $20. Inadequate supply air is really is a fire hazard and can be a health hazard or kill you if Carbon Monoxide is not allowed to leave your home. Additional air will eliminate that problem. Other problems can cause air ducts coming into your home to fail. Bird nests, snow, ETC. so routine visual inspection is advisable
If your house it too tight and you do not have enough air to allow to exist when the gas water heater is running then the exhaust won’t leave your home. In gas fired appliances The air for the flame to combust must come from somewhere and you do not want it to come from the exhaust pipe which is also a direct opening to the outside. “Combustion air” is the air that is needed to make the flame work and that is typically cut in low and “ventilation air” which is typically cut in high is the air required to make the gasses created during combustion leave the building. The point is that there must be ample air to make the device work correctly. Newer high efficiency gas fired appliances get their air directly through PVC pipes.
Makeup air is the air that an electric appliance like a kitchen exhaust fan creates. Imagine all of your fans are on where is the air coming from to be able to leave your house. Each one causes a vacuum. Larger kitchen fans over 400 CFM now require makeup air. These are usually installed to come on when the appliance is energized and often are incorporated into the HVAC system.
You can put a filter in the makeup air pipe just don’t let is get clogged up, I have used some filter fabric the stuff I got was about an inch thick comes on a roll and was half white and half blue) (Fastenal has it) that you can remove and clean out easily. PS 12 years is about the useful life span of a water heater FYI
The toilet paper trick is to open your front door very slightly and hold a square of TP up in the crack of the opening it will either push out of the door if the home is pressurized or suck back in if not. If you turn on your exhaust fans it will depressurize your home and suck the TP in harder. The new makeup air will lessen this effect and balance your home. Restaurants have a huge problem with this. Exhaust will always chose the “path of resistance”. Hope this helps, Let me know. we sort of got off on a tangent but an important one. I’m going to write a separate blog about this.
I have seen different universal thermocouplers with different MV; 22mv, 24mv , 0.03 mv; which one should I use to replace the thermocouple with TCO??
I am not familiar with different millivolt thermocouple ratings. I suppose I could look into it. I would imagine that if it is truly a thermocouple the gas flame should activate it. Let me know how it works. Joe
I thought it was interesting when you talked about how thermocouples are used in gas appliances. If I were to guess, a thermocouple is used to monitor the temperature in a gas appliance to make sure that things are operating properly and safely. It would be interesting to learn about the different types of machines that use thermocouples.
I guess it was a rhetorical question, they do not to monitor temperature. Sorry for the confusion.
Just ran into the same problem with my OASmith 50gal heater – the pilot light wouldn’t stay on. The service tech came out and was very clear that the thermocouple was fine (wrong), but that the gas controller was the problem. He suggested replacing the heater for 1550$. I looked into it and found the black button TCO (labeled 190) in the thermocouple. I had no idea what that was and thanks to your site, I now know. As others observed, one of the leads broke off the TCO. After soldering it, the unit works fine. Many thanks.
Fantastic story! Glad this helped, sorry for the slow response, the site is having issues. Joe
Great discussion!
Would there be any other (than rollout) particular reason why a sealed chamber might require a TCO, vs an open chamber (like the old tanks that you lit with a match, and they sometimes blew your wiskers off) that commonly uses a universal non-TCO thermocouple ? Since, I am neither an engineer or tech, I would hesitate to change a spec item, since my knowledge of the entire dynamic of the system is minimal. So my question is merely curiosity, as I would be to chicken to do so without knowing every possible ramification.
To put that in plain hick:
Does a sealed combustion chamber advise a TCO because it is sealed?
Thanks for asking Cy, I am not an engineer either. There were many garage explosions from old water heaters touching off solvents, gasoline, and combustibles set too close. Rollout was uncontrollable and happened often, I guess.
Code made them raise off the floor 18″ for starters then changed them to sealed combustion chambers. Then standing pilots went away and they are all electronic ignition. I think that the TCO was an interim step that broke the water heater requiring service to see what was going on and clean the air inlets.
The TCO will reset but the solder joints to it will not once melted. If they did not melt the water heater would short cycle and rollout would continue.
What pissses me off is that I think the weak link of the chain is a solder joint. I would like the TCO to pop and must be reset and looked at like so many other over temp circuit breakers found in furnaces.
That is my opinion. Joe
Does a thermocouple typically go out at once or could it work intermittently? The TCO seems to be solid and not overheated. My pilot will stay lit for weeks or one day than go out. I cleaned the flame arrestor, but it is hard to get to and I am not sure I got it completely unplugged. I hate to start pulling parts if it is just an airflow issue.
Thanks for asking Cy, I am not an engineer either. There were many garage explosions from old water heaters touching off solvents, gasoline, and combustibles set too close. Rollout was uncontrollable and happened often, I guess.
Code made them raise off the floor 18″ for starters then changed them to sealed combustion chambers. Then standing pilots went away and they are all electronic ignition. I think that the TCO was an interim step that broke the water heater requiring service to see what was going on and clean the air inlets.
The TCO will reset but the solder joints to it will not once melted. If they did not melt the water heater would short cycle and rollout would continue.
What pisses me off is that I think the weak link of the chain is a solder joint. I would like the TCO to pop and must be reset and looked at like so many other over temp circuit breakers found in furnaces.
That is my opinion. Joe
I soldered it and it worked perfectly for over 2 years, here we are in 5/8/23, and it is doing the same thing, guess i am going to have to pull it out again and re-solder it. It is kind of a pain doing this on a regular basis. The tank was installed 7/4/2006, so the original solder lasted 15 years, whereas my solder lasted 2yrs (unless it is a different issue, which I doubt). Any ideas why my solder job did not last as well as the original?
Cy, there are all kinds of solder, some melt at higher temperatures than others. Flux is a big part of the soldering process. As you can imagine there are variables. I am glad it worked for a few years. Remember, we are making sure that there is no rollout that is causing the button to be exposed to excess heat and actually working correctly to prevent a fire. Do blow out all the area and make sure that the unit has plenty of makeup air. Signs of rollout are soot and or scorching in the area. I would watch it turn on a time or two by turning up the thermostat to verify that there is no rollout. If not then I would fix the solder joint with a more industrial-strength solder. (Silver solder like HVAC guys use is up there at the higher end of what is out there. (I have not tried it for this application) and be happy. Joe
Thank you so much for this! I soldered the button and the water heater is working like a charm
Fantastic news, another satisfied customer!
Thanks for all the info here. I just wanted to add that the TCO (thermal cutout) is manufactured by a German company named Thermik. https://www.thermik.de/en/products
I believe the button style TCO used is their UM series, although most of them would work (as long as they are normally closed). And of course you’ll need to pick the right temp, 190 celcius. Just to clarifiy, I have seen several sites and links that state Fahrenheit, but that is incorrect, it is rated for degrees celcius. Especially since this is a German company. This brand is very difficult to find in the US, but similar a similar TCO can be found by searching for “thermal protector” or “thermal switch”. I think one with wire leads is actually preferable, so it takes the stress off the leads. My original TCO crumbled in half when I removed the assembly. Solder it on and you should be good to go. My original TCO crumbled in half when I removed the assembly. Hope this info helps.
Doug, thanks for your note and supplemental information. Amazing research. I am concerned that your TCO fell apart. Could you be getting rollout? of so you should do your best to clean out the area around of dust etc. The Celcius rather than Ferinheight makes sense too. Keep up the good work! Joe
Thanks for writing up this post – still helpful in 2021!
I just wanted to point out that since the TCO functions as a switch you should be extra careful when soldering if the soldering is being done on the TCO itself. Looking at the manufacturers website that Doug provided it looks like the middle of the TCO and the edge are the two separate contacts and if we are repairing this at home extra care should be taken to ensure that we don’t solder the contacts of the switch together. If that were to happen the TCO would be completely irrelevant in the circuit and it wouldn’t provide any protection.
This may be obvious but the original solder joints on mine were covered in a layer of epoxy or something so it could trick someone into thinking it’s all one contact.
Thank you for making this comment and observation. I agree completely, I soldered mine back into the same position and assumed it was intuitive.
Hi Joe,
I am back again for my biennial TCO repair and discussion, once again thanks for this blog. So over the years I have resoldered this thing 2 or 3 times, Each time it works perfectly afterwards. But this time the TCO is pretty much toast and disintegrated as I was soldering it. So can i buy another one, if so, do you happen to know where? or should i just solder the wires together and move on with my life? Even though I know I would miss discussing this at length as it has become a tradition now.
Cy, thanks for keeping in touch. I think it is worth looking carefully at the age of the water heater and determining if it is worth replacing. I assume you have blown it out with pressurized air periodically to ensure that there is not a clog-preventing air and causing a rollout situation. Air starvation is suspected. Is your water heater in an area without enough makeup air? You should be able to see the rollout when the water heater calls for the flame. The thermocouple is supposed to cut out the pilot when there is a rollout condition. I believe that low temp solder could be the culprit. That you have had to replace it regularly, it concerns me that something is causing the solder joint to fail. Please inspect the cycle of the water heater and see if the thermocouple is getting hot which is a danger sign. You can get a new pilot assembly and replace it. It was around $100 last I checked. Beware the melting solder could be foreshadowing a larger problem. Check and advise. Joe
Joe, Thanks for your thoughtful reply. Although this tank is 17 years old, I have had tanks last from 1 month (Reeem), to over 49 years (Bradford)(not sure how long it lasted, as it was still working when i sold the house).
I just watched as the flame came on. I am not exactly sure what “rollout” looks like, however, the flame lit effortlessly with no blast effect whatsoever, lit and the flame stayed the same size all within 1 second.
I admit (sigh) that I have not been cleaning the flame arrestor every third Tuesday as I am suppose to do. Because it is slightly impossible to get to. But in my defense, the time I did clean (when it was about 12 years old) it was quite clean, so I have been lax.
As for the thermocouple wire/tube, it is at ambient temp.
I suspect, as you also suggest, that the solder is not the right type (I am using electronic solder) I am not sure as to the differences in solders. And that regardless of the type of solder, they all have limited lifespans under the continuous heat cool cycle of the combustion chamber. The original solder lasted 12 years, mine usually last 2.
But the problem is always fixed when the TCO is connected. I never have to relight/reset the TCO which means it has never been called into use. I have no signs of improper ignition, smoke, dark spots, hot on outside of tank, etc. or operation to my knowledge.
At this point, I will succumb to paying the ransom of $100 to redeem this 20. cent part and perhaps i will get another 17 years. I would gladly pay up the cost of the entire unit, just to have the satisfaction of defeating the throw it away and buy a new one crowd who say it is old just replace the whole thing. Because, I also, am old and know better from experience that the DTF that is made today just may not outlast this old timer.
Cy, thank you, I feel that you have covered the bases. Some solders melt at different temperatures, Not all solders are alike. If the TCO still works then solder the darn thing again, I think that at this point if you wanted to, you could just replace the thermocouple without a TCO and be OK but you would be doing it with your eyes wide open. In other workds understanding the role of the TCO and being willing to go without the safety factor it provides. Joe
It is essential for homeowners to understand the thermocouple’s mechanism of action and importance to the safe operation of gas water heaters. It enables them to take care of and repair this equipment in the same manner as they would the water heater.
Cyrus, nice article on thermocouples, I agree that they are important and my readers do too. I noticed that you do not mention or talk about the button thermocouple rollout sensor. That is what my article is about.